Blog
How to Write for the Web
Writing for the web can be a daunting task, but it doesn’t have to be. Read our four steps to writing for the web before tackling your next page or site update.
Step 1: Understand that Writing for the Web is Different
Writing for the web is different than other mediums because of how users consume your content.
How users interact with content
Studies have shown that users barely read your content. The majority of users scan content; only 16% read content word-for-word. That means you have to have an easily scannable design, well-formatted content, and clearly defined sections.
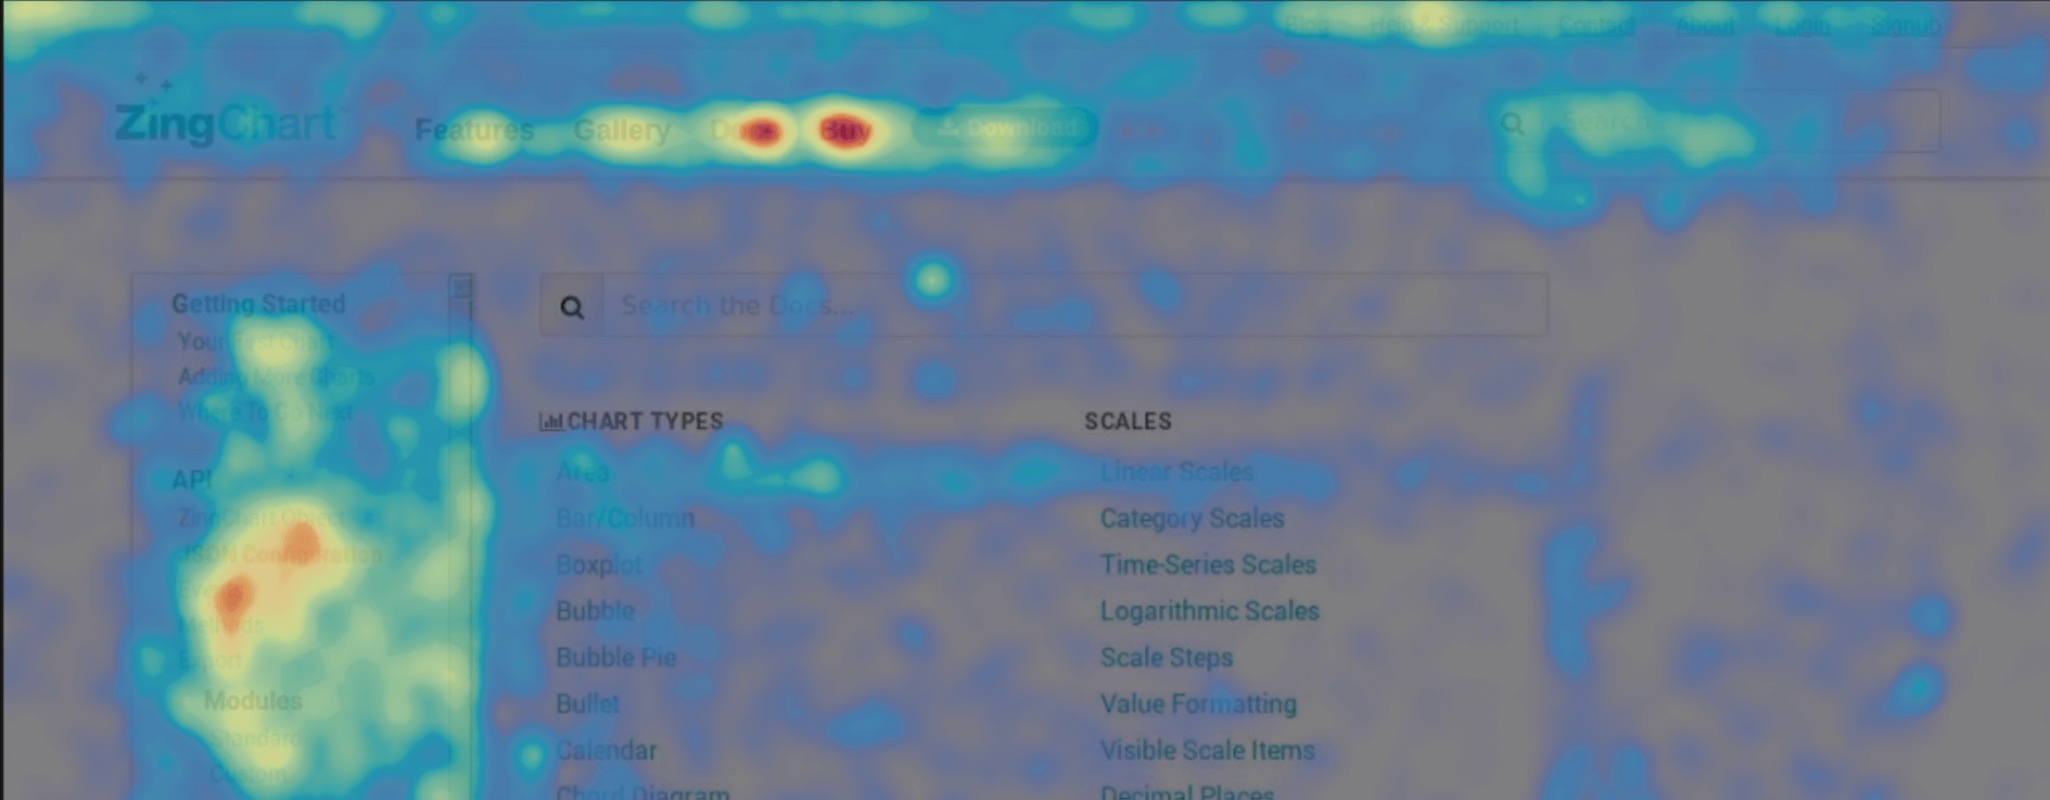
Users tend to consume a web page in an F pattern, according to eyetracking studies. The F pattern is made up of these eye movements:
- Scan horizontally across the top of the page
- Move down the page and look horizontally again
- Scan down the rest of the page vertically
![]()
We can use this information when we start writing and organizing our page content.
Step 2: Get to Know Your Users
We know that users are not going to thoroughly read our content, but that’s okay. What matters most is helping users. We can only help our users when we know who they are and what they want.
Demographics
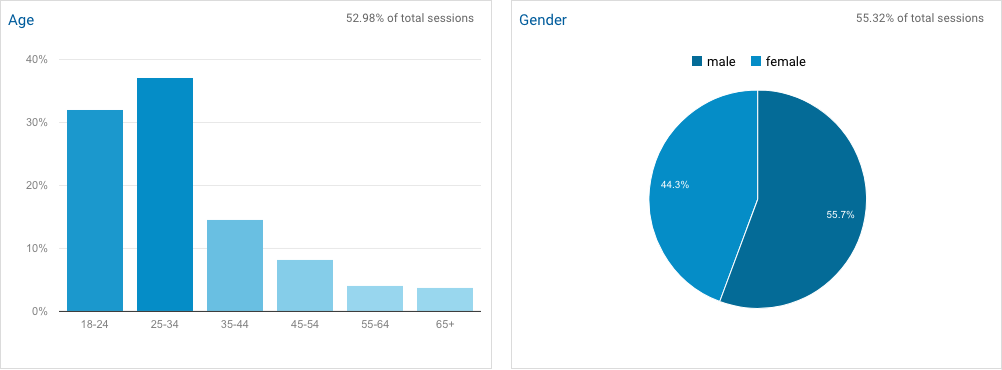
There is a range of analytics tools that can collect data from your site visitors. Use these tools to determine the location, ages, devices/browsers, gender, new vs. returning, etc. to get a better idea of who your users are. Once you know that, you can write for those users.
Below is a screenshot from Google Analytics which shows that the PINT audience skews slightly male and is typically under 35 years of age.
If, after reviewing your demographics, you find that most of your users are in high-population cities in their mid-20s and using mobile devices, your content should be written differently than if your users are in their 60s in rural areas on desktop devices.
Goals
Next, review the most used pages and most performed actions on your site to determine how your site is being used. Make sure that the pages the users need are accessible and clearly labeled.
For example, if users spend most of their time viewing guides or blog posts, they may be coming to your site for answers. In this case, it would be important to create a clear site structure that highlights the resources available to users.
Step 3: Write for Your Users
You aren’t writing website copy for your own company’s C-suite or your boss, as much as it may seem that way at times. You’re writing for the users – the people visiting, signing up, purchasing, and sharing your content.
So, how do you write for your users?
Put Important Info First
Since you’ve identified your users and their needs, you should have a good idea of who they are and why they’re coming to your site. Use that to put the information they need to accomplish their goals where you know they’re more likely to see it.
- Use the F pattern to put the most valuable/useful page content where users’ eyes tend to go.
- Use the “inverted pyramid” style of front-loading information when writing copy.
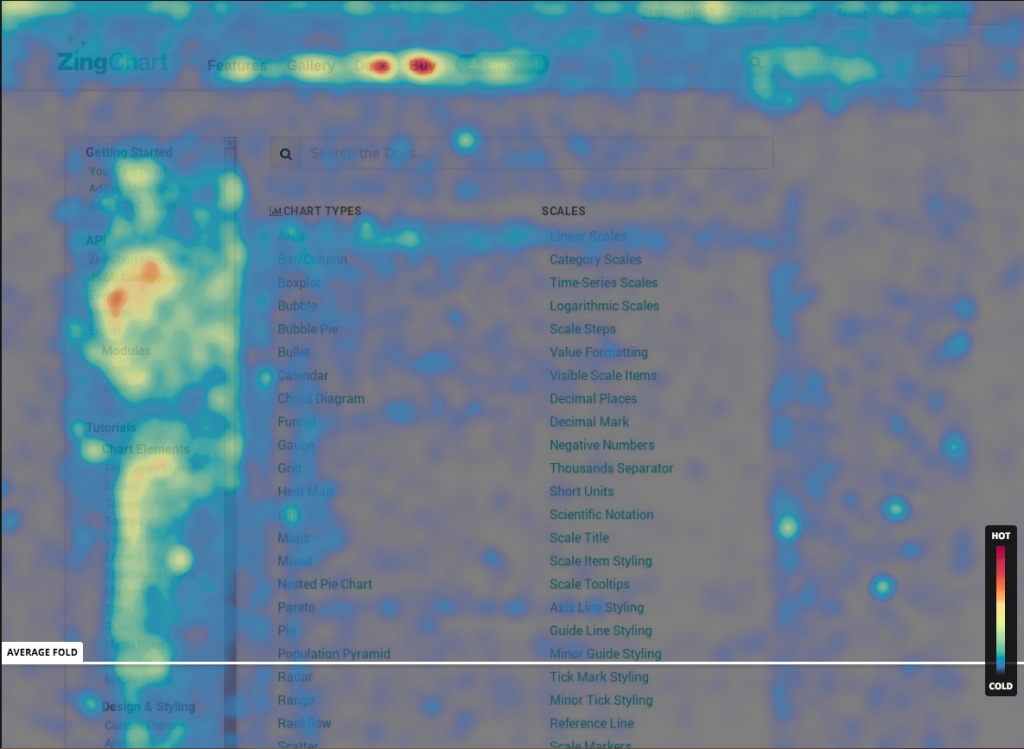
In the heatmap above, the hot spots show where users have moved their mouse. You can distinctly see an F pattern.
Have a Consistent Voice & Tone
Voice and tone can seem like daunting rules to follow, but really, the goal is to create guidelines so that all written materials (digital or otherwise) sound like your company. Using a consistent voice and tone will help the user recognize your company, which can foster trust and boost credibility.
Voice
An easy way to determine your voice is to think about the adjectives that define your brand personality. Are you friendly? Professional? Agreeable? Witty? Modern? Choose a few of these adjectives to start and write copy that embodies those adjectives.
Next, use active rather than passive voice when writing for the web. Active voice means that the subject of the sentence is performing the action.
X Passive: It is believed by the user that the discount must be placed on the order.
✓ Active: The user believes that you must place a discount on the order.
X Passive: The user was confused by the website.
✓ Active: The website confused the user.
X Passive: It was shown in studies that users do not read websites, but rather scan them.
✓ Active: Studies show that users do not read websites, but rather scan them.
Tone
Tone refers to the type of language you use when writing. What is the vibe of your company? Use the language that is familiar to your users. For clarity, when using pronouns, the user should always be “you” and your company should be “we.”
Another aspect of tone is standardization. To ensure that your company sounds like you, use the same language when referring to your company, departments, products, etc. Creating a Voice & Tone guide including these dos (and don’ts!) can help your writing stay consistent.
The Buffer Blog has an extensive guide to creating your voice and tone.
Formatting is Your BFF
Based on what we learned earlier about how users consume pages in an F pattern, it’s important to use formatting elements to place the most important information within the user’s eye path. A wall of text is rarely the best way to organize information. Instead, use headings, bullet points, and quotes to break up text.
Headings
Each page should have a page title that is an H1. This signifies to search engines (and users!) that it is the most important thing on that page. But your headings shouldn’t stop there. Use the H2, H3, and H4 headings to help break up your content. Using relevant headings for sections helps users sort through and prioritize the content more quickly.
Bullets
If you find that you’re listing out items in a sentence, consider using a bulleted list instead.
The benefits of bulleted lists are below:
- Make similar items easier to digest
- Break up paragraphs of text
- Help highlight information
When creating lists, make sure that each list item is parallel to the other list items in sentence structure and line length.
The Nielsen Norman Group put together a comprehensive guide on how to use bulleted lists.
Quotes
Use a special quote style to highlight important information. This is especially useful for users wanting to share quick snippets through social media.
Assets are Key
Use images, gifs, infographics, diagrams, and videos to add clarity and reinforce the message of your text. Assets should highlight important information and help break up text.
Below is a gif we used to highlight the testimonial section in a case study.

Assets also provide the user with more shareable content for social media. See Meta Description below for more information.
Be Concise
Less is more.
But really, the less your users have to wade through drawn out copy and redundant messages, the more likely you are to keep their attention. Be clear, be concise.
Step 4: Write for Search Engines
The last component of writing for the web is creating structured content for search engines. While not all of these impact your search rankings, they are important for users on search engines as well.
Title Tags
This is the title of your page, that shows up on SERPs as the clickable headline. It’s important to make this explanatory of what the page has in store for the user. The title tag also shows at the top of the browser when the user is on the page. Plus, when sharing to social media, the title tag is typically what is pulled in for a link preview.
Below is an example of which elements show up in a Google Search:

The characters in a title tag get cut off at a certain point depending on which search engine the user is on and what device is being used. A good rule is to have a 60 character limit for your title tags.
Meta Description
While the meta description (or sometimes called meta tag) does not impact your Google ranking, it does help the user learn more about your page before deciding to click through or not. Use this space to advertise for your page. Let the user know what to expect if they do click through to your site.
Meta descriptions are also what is pulled into a link preview for social media. For example, Twitter Cards will pull in the image, headline, and meta description.
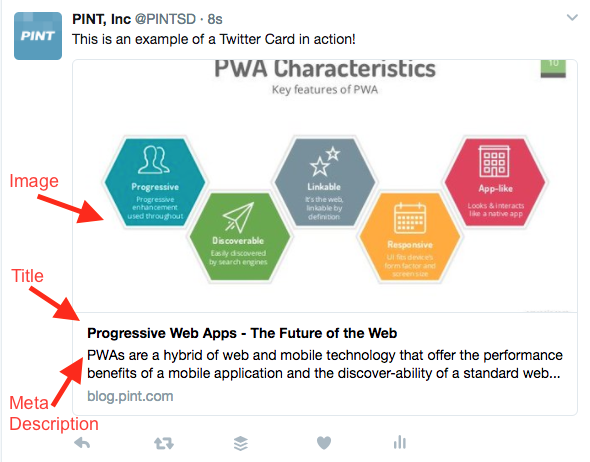
Note: If you use a double quotation mark, Google will cut off your meta description at that point in the text. If it’s necessary for your description, use the HTML entity instead.
Alt Tags
An alt tag is the text that is added as an attribute to an image. Alt tags are valuable because they provide descriptions for screen readers used by the visually impaired, as well as provide explanation text if an image doesn’t load.
Finally, alt tags also impact your search engine rankings. Be sure to write descriptive, keyword rich text.
We hope these tips will help you write better content for your next web project. If you want more help or have questions, get in touch with our team.
Related Articles

Accessibility on the Modern Web
There’s been a lot of buzz in the news lately about accessibility, specifically in reference to the dozens of ADA lawsuits that seem to be more and more...

Key Considerations for Investor Relations Websites
Creating an Investor Relations page that grabs the attention of various shareholders and instills confidence in your business is a crucial part of your company’s...

Improved Search Engine Optimization for a Medical Technology Company
Project Summary Glaukos had a 22% increase in organic search traffic and a 67% increase in form submissions through PINT’s initial round of search engine...